Back
BackBIO 127 - Anatomy and Physiology I Lab Midterm Study Guidance
Study Guide - Smart Notes
 Tailored notes based on your materials, expanded with key definitions, examples, and context.
Q1. Describe IN YOUR OWN WORDS how the rat dissection was performed. Please, mention as MANY DETAILS as you can. Include the description of the organs. Mention their location (use words like cavity, anterior, posterior, dorsal, ventral, superior, inferior, lateral, medial, etc), relation to other nearby structures, size, shape, color, interesting features. (5 pt)
Background
Topic: Rat Dissection & Anatomical Terminology
This question tests your understanding of anatomical terminology, spatial relationships, and the process of dissection. It also assesses your ability to describe organs and their locations using correct anatomical language.
Key Terms:
Anterior: Toward the front
Posterior: Toward the back
Dorsal: Toward the back (top side in quadrupeds)
Ventral: Toward the belly (bottom side in quadrupeds)
Superior: Above
Inferior: Below
Lateral: Away from the midline
Medial: Toward the midline
Cavity: A hollow space within the body (e.g., thoracic cavity, abdominal cavity)
Step-by-Step Guidance
Begin by describing how you prepared the rat for dissection (e.g., placement, securing, initial incision).
Explain how you opened the body cavity and identified major organs, using anatomical terms to describe their locations (e.g., "The heart is located in the thoracic cavity, medial to the lungs").
Describe the appearance of each organ (size, shape, color) and their spatial relationships (e.g., "The liver is inferior to the diaphragm and lateral to the stomach").
Use directional terms to explain the position of organs relative to each other (e.g., "The kidneys are dorsal and posterior to the intestines").
Try solving on your own before revealing the answer!
Q2. Describe IN YOUR OWN WORDS how YOU used lab microscope to look at the slides. Please, mention as MANY DETAILS as you can. Start with how you handle microscope, how you set it up, turn it on. Used different magnifications (what are they?). Finish with how you put it back. (5 pt)
Background
Topic: Laboratory Microscopy Techniques
This question tests your understanding of proper microscope handling, setup, use of magnifications, and care after use. It also assesses your ability to describe laboratory procedures in detail.
Key Terms:
Microscope: Instrument used to view small specimens
Magnification: The degree to which the specimen is enlarged (e.g., 4x, 10x, 40x, 100x)
Stage: Platform where slides are placed
Objective lens: Lenses of different magnifications
Coarse/Fine focus: Knobs used to adjust clarity
Step-by-Step Guidance
Describe how you safely carried the microscope and placed it on the lab bench.
Explain how you set up the microscope, including plugging it in, turning it on, and adjusting the light source.
Discuss how you placed the slide on the stage and used the stage clips to secure it.
Describe how you selected the lowest magnification objective lens, focused using the coarse and fine focus knobs, and then switched to higher magnifications as needed.
Try solving on your own before revealing the answer!

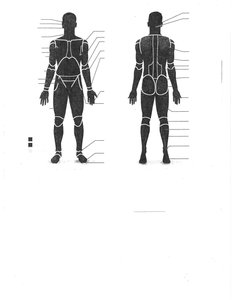
Q6. Label all body regions in Ex 2, p.11 (provided) (5 pt)
Background
Topic: Human Body Regions
This question tests your knowledge of anatomical regions and terminology used to describe locations on the human body.
Key Terms:
Body regions: Specific areas of the human body (e.g., thorax, abdomen, dorsum)
Anterior/Posterior: Front/back
Labeling: Identifying and naming regions on a diagram
Step-by-Step Guidance
Review the provided diagram of the human body and identify the outlined regions.
Use anatomical terminology to label each region (e.g., "Thorax" for chest, "Abdomen" for belly, "Dorsum" for back).
Refer to your textbook or lab manual for the correct names and locations of each region.
Try solving on your own before revealing the answer!

Q7. Label all indicated parts of a microscope in Ex.1 p.33 (provided) (5 pt)
Background
Topic: Microscope Anatomy
This question tests your ability to identify and label the parts of a compound microscope.
Key Terms:
Eyepiece (Ocular lens): Where you look through
Objective lenses: Different magnifications
Stage: Holds the slide
Coarse/Fine focus: Adjusts clarity
Arm, Base: Structural parts
Step-by-Step Guidance
Examine the provided microscope diagram and locate each labeled part.
Use your lab manual or textbook to match each label to the correct anatomical term (e.g., "Eyepiece", "Stage", "Objective lens").
Write the names next to each label on the diagram.
Try solving on your own before revealing the answer!
Q9. Label all organelles ON the plate 1-4 from the Netter's Anatomy Coloring Book (please write on the coloring sheet!) Briefly describe their functions ON THIS SHEET! (5 pt)
Background
Topic: Cell Structure and Function
This question tests your knowledge of cell organelles and their functions.
Key Terms:
Organelle: Specialized structure within a cell (e.g., nucleus, mitochondria, Golgi apparatus)
Function: The role each organelle plays in cell physiology
Step-by-Step Guidance
Examine the provided cell diagram and identify each labeled organelle.
Use your textbook or lab manual to match each organelle to its name and function (e.g., "Nucleus: stores genetic material", "Mitochondria: produces energy").
Write the names and brief functions next to each label on the coloring sheet.
Try solving on your own before revealing the answer!


Q11. Using the provided diagram name all phases of the cell cycle and describe what happens during each phase. (5 pt)
Background
Topic: Cell Cycle
This question tests your understanding of the phases of the cell cycle and the events that occur in each phase.
Key Terms:
Cell cycle: The series of events that cells go through as they grow and divide
Phases: Interphase (G1, S, G2), Mitosis (Prophase, Metaphase, Anaphase, Telophase), Cytokinesis
Step-by-Step Guidance
Examine the provided cell cycle diagram and identify each phase.
For each phase, describe the main events (e.g., "G1: cell growth", "S: DNA replication", "Mitosis: division of nucleus").
Use your textbook or lab manual to confirm the sequence and details of each phase.
Try solving on your own before revealing the answer!


Q17. Briefly explain the tonicity. Provide the picture and/or description of the erythrocytes (RBC) in three different types of tonic solutions. (2 pt)
Background
Topic: Tonicity and Red Blood Cells
This question tests your understanding of tonicity (hypertonic, hypotonic, isotonic solutions) and how red blood cells respond to each.
Key Terms:
Tonicity: The ability of a solution to cause a cell to gain or lose water
Hypertonic: Solution causes cell to lose water (shrivel)
Hypotonic: Solution causes cell to gain water (swell/burst)
Isotonic: Solution causes no net movement of water (cell remains normal)
Erythrocyte: Red blood cell (RBC)
Step-by-Step Guidance
Define tonicity and describe the three types of solutions (hypertonic, hypotonic, isotonic).
Explain what happens to erythrocytes in each solution (e.g., "In a hypertonic solution, RBCs lose water and shrink").
Use diagrams or textbook images to illustrate the appearance of RBCs in each solution.
Try solving on your own before revealing the answer!