 Back
BackThe Compound Microscope: Structure and Function (Relevant to Cells: The Living Units)
Study Guide - Smart Notes
 Tailored notes based on your materials, expanded with key definitions, examples, and context.
The Compound Microscope
Introduction
The compound microscope is an essential tool in anatomy and physiology for studying cells and tissues. Understanding its parts and their functions is crucial for effective microscopic examination of biological specimens.
Major Parts of the Compound Microscope
Base: The bottom of the microscope, providing a sturdy, flat surface to support and steady the instrument.
Substage Light: Located in the base; the light from the lamp passes directly upward through the microscope.
Light Control: Located on the base or arm; this dial allows adjustment of the intensity of the light passing through the specimen.
Stage: The platform where slides are placed for viewing. The stage has a hole to allow light to pass through the specimen.
Mechanical Stage: Holds the slide in position for viewing and has two adjustable knobs that control the precise movement of the slide.
Iris Diaphragm Lever: Regulates the amount of light passing through the condenser. It can be adjusted to optimize contrast and resolution.
Condenser: Focuses light on the specimen. It can be moved closer or farther from the stage to adjust the intensity and focus of light.
Coarse Adjustment Knob: Allows large adjustments to the height of the stage to initially focus your specimen.
Fine Adjustment Knob: Permits precise focusing once coarse focusing has been completed.
Head: Supports the objective lens system and the ocular lenses (eyepieces).
Arm: Vertical portion connecting the base and the head; used for carrying the microscope.
Nosepiece: Rotating mechanism at the head; carries the objective lenses and allows switching between them.
Objective Lenses: Usually three or four lenses of varying magnification (e.g., 4×, 10×, 40×, 100×). The shortest is typically the scanning lens (4×), followed by low-power (10×), high-power (40×), and oil immersion (100×).
Ocular Lenses (Eyepieces): Binocular lenses at the superior end of the head, usually with a magnification of 10×. Some may have a pointer or reticle for measurement.
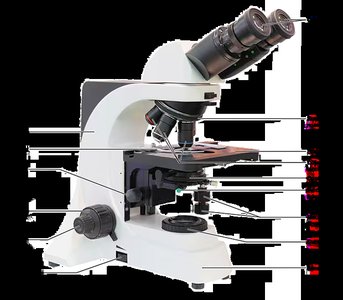
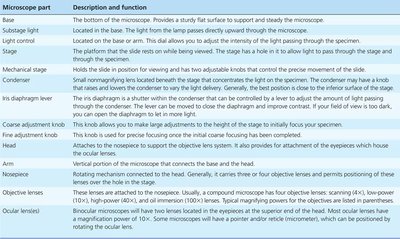
Table: Parts of the Microscope and Their Functions
Microscope part | Description and function |
|---|---|
Base | The bottom of the microscope. Provides a sturdy flat surface to support and steady the microscope. |
Substage light | Located in the base. The light from the lamp passes directly upward through the microscope. |
Light control | Located on the base or arm. This dial allows you to adjust the intensity of the light passing through the specimen. |
Stage | The platform that the slide rests on while being viewed. The stage has a hole in it to allow light to pass through the stage and through the specimen. |
Mechanical stage | Holds the slide in position for viewing and has two adjustable knobs that control the precise movement of the slide. |
Iris diaphragm lever | This lever regulates the amount of light passing through the condenser. It can be opened to allow more light or closed to reduce light and increase contrast. |
Condenser | Small nonmagnifying lens located beneath the stage that concentrates the light on the specimen. The condenser may have a knob that raises and lowers it to vary the light delivery. Generally, the best position is close to the inferior surface of the stage. |
Coarse adjustment knob | This knob allows you to make large adjustments to the height of the stage to initially focus your specimen. |
Fine adjustment knob | This knob is used for precise focusing once the initial coarse focusing has been completed. |
Head | Supports the objective lens system and the ocular lenses (eyepieces). |
Arm | Vertical portion of the microscope that connects the base and the head. |
Nosepiece | Rotating mechanism connected to the head. Generally, it carries three or four objective lenses and permits positioning of these lenses over the hole in the stage. |
Objective lenses | These are attached to the nosepiece. They typically include a scanning lens (4×), a low-power lens (10×), a high-power lens (40×), and an oil immersion lens (100×). Typical magnifying powers for the objectives are listed above. |
Ocular lenses | Binocular microscopes will have two lenses at the superior end of the head, usually with a magnification of 10×. Most ocular lenses have a pointer and/or reticle (micrometer), which can be positioned by rotating the ocular lens. |
Using the Objective Lenses
The scanning lens (4×) is the shortest and is used for locating the specimen and general orientation.
The low-power lens (10×) provides greater detail and is used for focusing on specific areas.
The high-power lens (40×) is used for observing fine details of the specimen.
The oil immersion lens (100×) is used for the highest magnification and requires a drop of oil between the lens and the slide to improve resolution.
Example: Application in Cell Biology
Microscopes are fundamental for studying cells, the basic units of life. By using different objective lenses, students can observe cell structure, identify organelles, and distinguish between different tissue types, which is essential for understanding human anatomy and physiology.
Additional info: Mastery of microscope use is foundational for laboratory work in anatomy and physiology, especially in topics such as cell structure (Ch. 3) and tissue identification (Ch. 4).
