 Back
BackThe Human Spinal Cord: Structure, Function, and Clinical Correlates
Study Guide - Smart Notes
 Tailored notes based on your materials, expanded with key definitions, examples, and context.
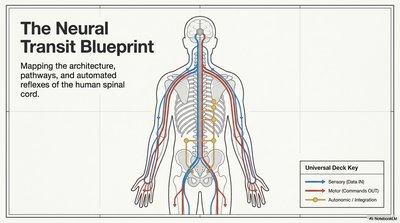
The Neural Transit Blueprint
Overview of Spinal Cord Pathways
The spinal cord serves as the main conduit for information traveling between the brain and the rest of the body. It contains distinct pathways for sensory input, motor output, and autonomic integration, ensuring rapid and organized neural communication.
Sensory Data (IN): Blue pathways carry sensory information from the body to the spinal cord and brain.
Motor Commands (OUT): Red pathways transmit motor instructions from the central nervous system to muscles.
Autonomic/Integration: Yellow pathways mediate involuntary functions and reflexes.
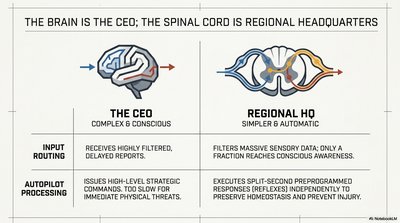
Central Processing: Brain vs. Spinal Cord
Functional Division of Labor
The brain and spinal cord have distinct but complementary roles in neural processing. The brain acts as the central executive, while the spinal cord manages regional, automatic responses.
The CEO (Brain) | Regional HQ (Spinal Cord) | |
|---|---|---|
Input Routing | Receives highly filtered, delayed reports | Filters massive sensory data; only a fraction reaches conscious awareness |
Autopilot Processing | Issues high-level strategic commands (too slow for immediate threats) | Executes split-second preprogrammed responses (reflexes) to preserve homeostasis and prevent injury |
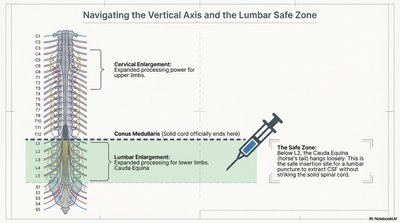
Vertical Axis and the Lumbar Safe Zone
Spinal Cord Segmentation and Clinical Relevance
The spinal cord is segmented, with enlargements for limb control and a terminal region called the conus medullaris. Below this, the cauda equina provides a safe zone for lumbar puncture procedures.
Cervical Enlargement: Increased processing for upper limbs.
Lumbar Enlargement: Increased processing for lower limbs.
Conus Medullaris: Official end of the solid cord (around L1-L2).
Safe Zone: Below L2, the cauda equina's loose nerves allow safe CSF extraction without damaging the cord.
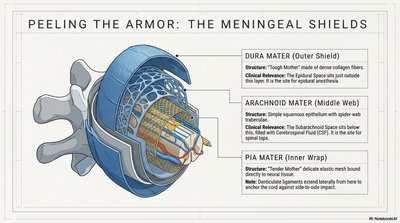
Meningeal Shields: Protective Layers of the Spinal Cord
Structure and Clinical Importance
The spinal cord is protected by three connective tissue layers called meninges, each with distinct structure and clinical significance.
Dura Mater (Outer Shield): Tough, dense collagen; site for epidural anesthesia.
Arachnoid Mater (Middle Web): Simple squamous epithelium with spider web-like fibers; subarachnoid space contains CSF and is the site for spinal taps.
Pia Mater (Inner Wrap): Delicate, thin layer bound to neural tissue; extensions anchor the cord against sudden movement.
Spinal Cord Cross-Section: White Matter vs. Gray Matter
Functional and Structural Organization
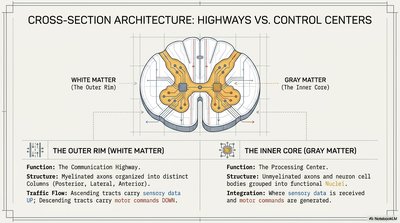
The spinal cord's cross-section reveals an outer rim of white matter (communication highways) and an inner core of gray matter (processing centers).
White Matter (Outer Rim) | Gray Matter (Inner Core) | |
|---|---|---|
Function | Communication highway | Processing center |
Structure | Myelinated axons in columns (posterior, lateral, anterior) | Unmyelinated axons and neuron cell bodies grouped into nuclei |
Traffic Flow | Ascending tracts (sensory data up), descending tracts (motor commands down) | Integration of sensory and motor commands |
Gray Matter Subdivisions: Horns and Commissures
Functional Zones of the Gray Matter
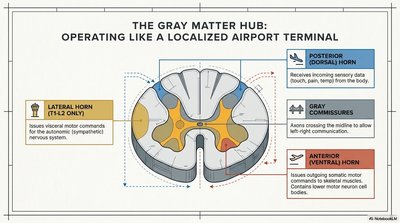
The gray matter is organized into horns, each with specialized functions, and commissures for cross-communication.
Posterior (Dorsal) Horn: Receives incoming sensory data (touch, pain, temperature).
Lateral Horn (T1-L2 only): Issues visceral motor commands for the autonomic nervous system.
Anterior (Ventral) Horn: Issues outgoing somatic motor commands to skeletal muscles.
Gray Commissures: Axons crossing the midline for left-right communication.
Spinal Nerve Roots: Entry and Exit Points
Organization of Sensory and Motor Pathways
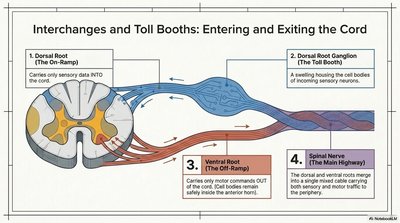
Spinal nerves connect the spinal cord to the periphery via distinct roots and ganglia, ensuring organized traffic flow for sensory and motor signals.
Dorsal Root: Carries only sensory data into the cord.
Dorsal Root Ganglion: Contains cell bodies of incoming sensory neurons.
Ventral Root: Carries only motor commands out of the cord.
Spinal Nerve: Merged sensory and motor roots form a single mixed cable carrying both types of signals to/from the periphery.
Nerve Plexuses: Structural Redundancy
Prevention of Paralysis through Plexus Formation
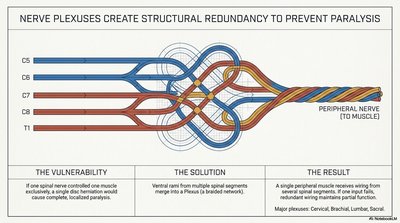
Nerve plexuses are networks where ventral rami from multiple spinal segments merge and redistribute, ensuring that a single peripheral nerve receives fibers from several spinal levels. This redundancy protects against complete paralysis from a single spinal injury.
Major Plexuses: Cervical, Brachial, Lumbar, Sacral.
Clinical Importance: Damage to one spinal segment does not paralyze the entire muscle group.
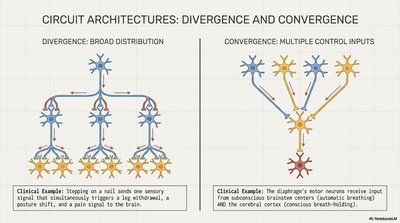
Neural Circuit Architectures: Divergence and Convergence
Distribution and Integration of Neural Signals
Neural circuits in the spinal cord can diverge (one input, many outputs) or converge (many inputs, one output), allowing for complex control and coordination.
Divergence: Broad distribution of a single sensory signal to multiple targets (e.g., pain triggers withdrawal, posture shift, and brain alert).
Convergence: Multiple sources of input control a single motor neuron (e.g., diaphragm receives both automatic and voluntary commands).
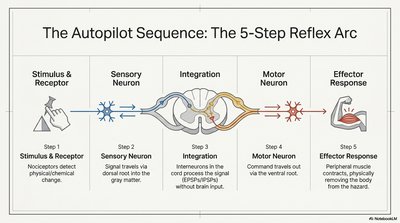
The Reflex Arc: Sequence of Autopilot Response
Five Steps of the Reflex Arc
Reflexes are rapid, automatic responses to stimuli, processed at the spinal cord level without brain involvement. The classic reflex arc consists of five steps:
Stimulus & Receptor: Nociceptors detect physical/chemical change.
Sensory Neuron: Signal travels into the gray matter.
Integration: Interneurons process the signal (EPSPs/IPSPs) in the cord.
Motor Neuron: Command travels out via the ventral root.
Effector Response: Muscle contracts, pulling body away from hazard.
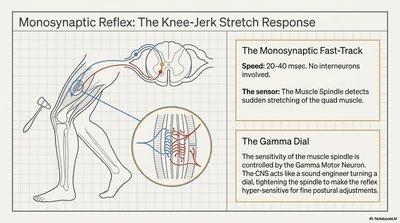
Monosynaptic Reflex: The Knee-Jerk Response
Mechanism and Clinical Application
The monosynaptic stretch reflex is the fastest reflex arc, involving only one synapse between the sensory and motor neuron. It is exemplified by the patellar (knee-jerk) reflex.
Speed: 20-40 milliseconds; no interneurons involved.
Sensor: Muscle spindle detects sudden stretch.
Gamma Motor Neuron: Adjusts spindle sensitivity for fine-tuning reflexes.
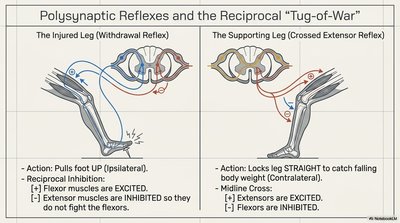
Polysynaptic Reflexes: Reciprocal Inhibition and Crossed Extensor Reflex
Complex Reflex Coordination
Polysynaptic reflexes involve multiple synapses and interneurons, allowing for more complex responses such as withdrawal and support during injury.
Withdrawal Reflex: Injured leg flexes (pulls up); extensors are inhibited.
Crossed Extensor Reflex: Opposite leg extends to support body weight; flexors are inhibited, extensors are excited.
Descending Inhibition and the Babinski Sign
Higher Control of Reflexes
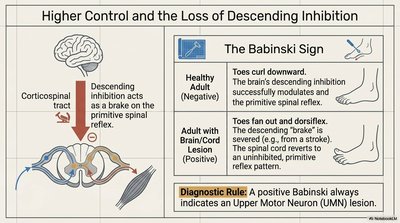
The brain exerts descending inhibition on spinal reflexes. Loss of this control, as seen in upper motor neuron lesions, leads to pathological reflexes such as the Babinski sign.
Healthy Adult: Toes curl downward (normal inhibition).
UMN Lesion: Toes fan upward (Babinski sign positive).
Diagnostic Rule: Positive Babinski always indicates an upper motor neuron lesion.
Clinical Diagnostic Matrix: UMN vs. LMN Lesions
Key Features for Localization
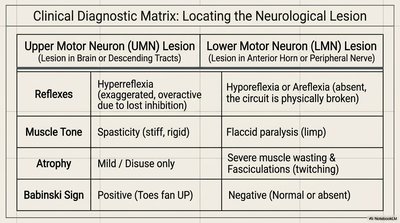
Distinguishing between upper and lower motor neuron lesions is critical for neurological diagnosis. The following table summarizes the main differences:
Upper Motor Neuron (UMN) Lesion | Lower Motor Neuron (LMN) Lesion | |
|---|---|---|
Reflexes | Hyperreflexia (exaggerated) | Hyporeflexia or Areflexia (absent) |
Muscle Tone | Spasticity (stiff, rigid) | Flaccid paralysis (limp) |
Atrophy | Mild/disuse only | Severe muscle wasting, fasciculations |
Babinski Sign | Positive (toes fan up) | Negative (normal/absent) |
System Failures: Spinal Shock vs. Cauda Equina Syndrome
Acute and Chronic Spinal Cord Pathologies
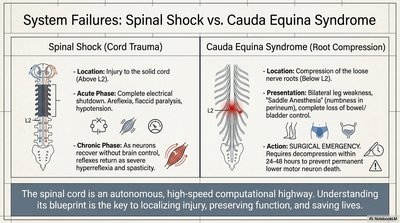
Understanding the difference between spinal shock and cauda equina syndrome is essential for emergency and long-term neurological care.
Spinal Shock (Cord Trauma) | Cauda Equina Syndrome (Root Compression) | |
|---|---|---|
Location | Solid cord (above L2) | Loose nerve roots (below L2) |
Symptoms | Acute: paralysis, areflexia; Chronic: hyperreflexia, spasticity | Bilateral leg weakness, saddle anesthesia, bladder/bowel dysfunction |
Action | Supportive care | Surgical emergency |
Additional info: These notes integrate foundational neuroanatomy with clinical applications, supporting mastery for exams and practical diagnosis.
