 Back
BackMethods of Measurement in Chemistry: Accuracy, Density, and Laboratory Practice
Study Guide - Smart Notes
 Tailored notes based on your materials, expanded with key definitions, examples, and context.
Measurement in Science and Medicine
Introduction to Measurement in Chemistry
Accurate measurement is fundamental to all chemical experiments and medical applications. This laboratory exercise introduces students to common measurement tools, the importance of significant figures, and the calculation of density using water displacement—a method analogous to hydrostatic weighing used in clinical settings.
Common Laboratory Measurement Tools
Types of Glassware and Devices
Chemists use a variety of glassware and devices to measure mass, volume, and temperature. Each tool has a specific level of accuracy and is suited for different tasks:
Beaker: Used for rough volume measurements; not highly accurate.
Graduated Cylinder: Used for more precise volume measurements; marked in milliliters (mL).
Volumetric Flask: Used for preparing solutions of precise volumes; highly accurate for its marked volume.
Syringe: Used for measuring and transferring small, precise volumes of liquids.
Thermometer: Used to measure the temperature of liquids, which is important because temperature affects density calculations.
Balance: Used to measure mass to several decimal places.
Accuracy and Significant Figures
Each measuring device has a different degree of accuracy. When recording measurements, always include all certain digits plus one estimated digit (the first uncertain digit). This practice ensures that data is reported with the correct number of significant figures.
Significant Figures: The digits in a measurement that are known with certainty plus one that is estimated.
Example: If a graduated cylinder is marked to the nearest 1 mL, estimate to the nearest 0.1 mL.
Hydrostatic Weighing and Density Measurement
Principle of Hydrostatic Weighing
Hydrostatic weighing is a technique used to determine the density of an object (or a person, in clinical settings) by measuring its mass and the volume of water it displaces. This method is highly accurate and is used, for example, to estimate body fat percentage.
Density (\( \rho \)): Defined as mass divided by volume.
Application: In the lab, you will measure the mass of a solid object and determine its volume by water displacement, then calculate its density.
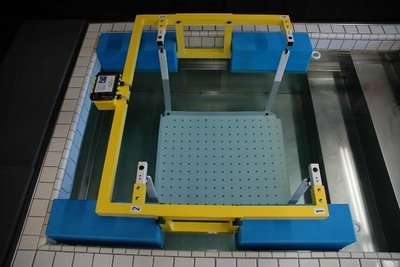
Water Displacement Method
To find the volume of an irregularly shaped object, submerge it in water and measure the change in water level. The difference in volume readings before and after submersion equals the object's volume.
Record the initial volume of water in a graduated cylinder.
Gently add the object and record the new volume.
Calculate the object's volume: Volume = Final Volume - Initial Volume.
Proper Measurement Technique: Reading the Meniscus
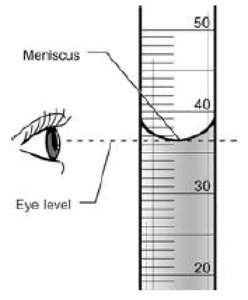
When measuring liquid volumes, always read the bottom of the meniscus at eye level to avoid parallax error. The meniscus is the curved surface of the liquid in a container.
Experimental Procedure Overview
Part 1: Determining Accuracy of Measuring Tools
1. Gather all required glassware and devices. 2. Measure and record the mass of each empty tool. 3. Fill each tool with a specified volume of water and record the mass again. 4. Use the thermometer to record the water temperature, as density calculations depend on temperature. 5. Compare the measured volumes to the expected values to assess accuracy.
Part 2: Determining Density of an Unknown Object
1. Obtain an assigned object and record its identifying color. 2. Measure and record the object's mass. 3. Fill a graduated cylinder with water and record the initial volume. 4. Submerge the object and record the new volume. 5. Repeat the measurement multiple times for accuracy. 6. Calculate the object's density using the formula above.
Data Recording and Example Tables
Sample Data Table: Measuring Tool Accuracy
The following table structure is used to compare the accuracy of different measuring tools:
Tool | Mass of Tool (Empty) (g) | Mass of Tool with Water (g) |
|---|---|---|
100 mL Beaker | ||
50 mL Graduated Cylinder | ||
50 mL Volumetric Flask | ||
10 mL Syringe |
Sample Data Table: Density Determination
Trial # | Initial Volume (mL) | Volume After Object Added (mL) |
|---|---|---|
1 | ||
2 | ||
3 | ||
4 |
Reporting and Interpreting Data
Using Data to Support Conclusions
When answering post-lab questions, always use your actual data to justify your conclusions. For example, compare percent errors between tools to determine which is more accurate. Avoid vague statements; instead, provide specific values and reasoning.
Poor Answer: "The beaker was less accurate than the syringe."
Good Answer: "The percent error for the beaker was 20%, while the syringe's was 5%, indicating the syringe is more accurate."
Discussing Experimental Errors
Identify specific sources of error related to the experimental design or procedure. Avoid generic terms like "human error" unless you can describe a specific, unavoidable mistake. Always explain how the error would affect your results.
Example: "We spilled our sample, which reduced our yield and affected the accuracy of our results."
Sample Calculations
Include at least one sample calculation for each type of calculation performed. For density:
Always use the correct number of significant figures and units in your calculations.
Laboratory Clean-Up and Safety
Proper Laboratory Practices
After completing the experiment, follow all clean-up procedures to ensure safety and maintain the laboratory environment. This includes cleaning glassware, returning equipment, wiping down work areas, and washing hands before leaving.
Summary
This laboratory exercise reinforces the importance of accurate measurement, proper technique, and careful data recording in chemistry. Mastery of these foundational skills is essential for success in both academic and clinical laboratory settings.
