 뒤로
뒤로The Compound Microscope: Structure, Function, and Use
스터디 가이드 - 스마트 노트
 자료에 맞춘 맞춤형 노트, 핵심 정의, 예시, 맥락을 확장해 제공합니다.
Care and Structure of the Compound Microscope
Introduction to the Compound Microscope
The compound microscope is an essential tool in biological sciences, allowing for the observation of structures too small to be seen by the unaided eye. Mastery of its use is foundational for studies in anatomy and physiology, particularly for examining cells and tissues.
Microscope: An optical instrument that magnifies small objects using a system of lenses.
Compound microscope: Uses two sets of lenses (ocular and objective) to achieve high magnification and resolution.
Applications: Used to study cells, tissues, and microorganisms in detail.
Proper Care and Handling of the Microscope
Always carry the microscope upright with one hand on the arm and the other supporting the base.
Clean lenses only with special lens paper and cleaner, using a gentle circular motion.
Begin focusing with the lowest-power objective lens and use the coarse adjustment knob only with this lens.
Always use a coverslip with wet mounts to protect the objective lens.
Before storage, remove the slide, set the lowest-power lens in position, wrap the cord, and cover the microscope.
Report any mechanical issues to your instructor; do not attempt repairs yourself.
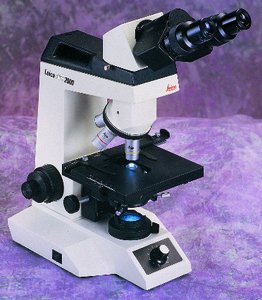
Parts of the Compound Microscope
Major Components and Their Functions
Base: Supports the microscope and houses the light source or mirror.
Substage light or mirror: Provides illumination for viewing specimens.
Stage: Platform where the slide is placed; may have clips or a mechanical stage for precise movement.
Condenser: Focuses light onto the specimen; adjustable for optimal illumination.
Iris diaphragm lever: Regulates the amount of light passing through the condenser, enhancing contrast.
Coarse adjustment knob: Moves the stage or objective lens for general focusing (use only with low power).
Fine adjustment knob: Allows for precise focusing at higher magnifications.
Head or body tube: Supports the ocular and objective lenses.
Arm: Connects the base and head; used for carrying the microscope.
Ocular (eyepiece): Lens through which observations are made; typically 10× magnification.
Nosepiece: Rotating mechanism holding objective lenses; allows switching between magnifications.
Objective lenses: Multiple lenses with varying magnifications (e.g., 4×, 10×, 40×, 100× oil immersion).
Magnification and Resolution
Principles of Magnification
Magnification is achieved by the combined action of the ocular and objective lenses. The total magnification (TM) is calculated as:
Example: If the ocular lens is 10× and the objective lens is 45×, then TM = 10 × 45 = 450×.
Resolution (Resolving Power)
Resolution: The ability to distinguish two close objects as separate entities.
The human eye can resolve objects about 100 μm apart; a compound microscope can resolve objects as close as 0.2 μm.
Resolution depends on the amount and properties of light entering the microscope; higher magnification requires more light for optimal resolution.
Microscope Field and Estimating Object Size
Field of View and Its Measurement
The field of view decreases as magnification increases.
Knowing the field diameter allows estimation of object size within the field.
Field size is typically measured in millimeters (mm) or micrometers (μm).
Calculating Field Diameter at Different Magnifications
To calculate the unknown field diameter at a higher magnification:
Example: If the low-power field is 2 mm at 50×, the high-power field at 100× is (2 mm × 50) / 100 = 1 mm.
Metric Units of Length
Metric Unit | Abbreviation | Equivalent |
|---|---|---|
Meter | m | ~39.3 in. |
Centimeter | cm | 10-2 m |
Millimeter | mm | 10-3 m |
Micrometer (micron) | μm | 10-6 m |
Nanometer | nm | 10-9 m |
Ångstrom | Å | 10-10 m |
Depth of Field
Understanding Depth in Microscopy
Specimens have depth as well as length and width; depth of field refers to the thickness of the specimen that is in focus at one time.
Depth of field is greater at lower magnifications and decreases as magnification increases.
To determine the order of layers (e.g., colored threads), focus up and down and note which layer comes into focus first.
Wet Mount Preparation and Viewing Cells
Preparing a Wet Mount
Place a drop of physiologic saline on a clean slide.
Scrape the inner cheek lining with a flat-tipped toothpick and mix the sample in the saline.
Add a drop of stain (iodine or methylene blue) to enhance visibility of cell structures.
Hold a coverslip at a 45° angle and lower it gently to avoid air bubbles.
Remove excess fluid with filter paper.
Observe under the microscope, starting with low power and increasing as needed.
Cheek epithelial cells: Thin, six-sided cells that line the cheek cavity; staining highlights the nucleus and cytoplasm.
Key Terms and Definitions
Parfocal: A microscope property where the specimen remains in focus when switching between objective lenses.
Field: The visible area seen through the microscope.
Depth of field: The vertical range within which the specimen remains in focus.
Virtual image: The image seen by the eye, formed by the ocular lens magnifying the real image produced by the objective lens.
Resolution: The ability to distinguish two points as separate; higher resolution means greater detail.
Summary Table: Microscope Lenses and Field
Scanning | Low Power | High Power | Oil Immersion | |
|---|---|---|---|---|
Magnification of Objective Lens | 4× | 10× | 40× | 100× |
Magnification of Ocular Lens | 10× | 10× | 10× | 10× |
Total Magnification | 40× | 100× | 400× | 1000× |
Working Distance | Longest | Long | Short | Shortest |
Field Size (Diameter) | Largest | Large | Small | Smallest |
Additional info: Actual values for working distance and field size depend on the specific microscope model and should be measured as described in the activities.
Best Practices and Troubleshooting
Always center the object before switching to higher magnification to keep it in view.
Dim the light when viewing nearly transparent or living cells to increase contrast and prevent drying.
Use only the fine adjustment knob at high magnification to avoid damaging slides and lenses.
If only half the field is illuminated, check that the objective lens is fully clicked into position.
If the field does not move with the mechanical stage, ensure the slide is properly secured.
